
Set up your FRITZ!Box
for encrypted calls
Connect your Lodestar number, protect the connection to Lodestar and choose which handset rings. We will take you through each setting.
Shown on a FRITZ!Box 7530. Menu names can vary with your model and FRITZ!OS version.
Before you begin
Have these details ready
- Your equipment
- A FRITZ!Box that supports internet telephony, with current supported FRITZ!OS and TLS/SRTP options. It must be online, with a phone connected to it or a cordless handset registered.
- Your Lodestar details
- An active account with encrypted calling enabled, your Lodestar phone number, SIP username and SIP password. Ask Lodestar if you have not received these details or need encryption enabled.
- Your router password
- The password you normally use to open the FRITZ!Box settings. This is different from your SIP password.
The numbers in this guide are examples. The screenshots show an example Lodestar account using 02477753247. Use your own assigned phone number, SIP username and SIP password throughout. Screenshots illustrate where the settings are; follow the values and number formats explained in each step.
What encryption covers. TLS protects the call setup and account signalling. SRTP protects the call audio between your FRITZ!Box and Lodestar. Calls can travel over other telephone networks after Lodestar, so this is not a promise of encryption all the way to the person you call.
Keep your phone connected to power and the internet. Calls, including emergency calls, stop if either fails. No emergency backup is included.
Step 1
Open your FRITZ!Box settings
- Connect your computer, tablet or phone to the FRITZ!Box network.
- Open a web browser and type
http://fritz.boxinto the address bar. If you already use a different address for your router, use that address. - Sign in with your FRITZ!Box password.
- Open Telephony, then Phone Numbers. Choose New Phone Number.
If your Lodestar number is already listed, select its edit button instead of adding a duplicate.
Step 2
Add your Lodestar number
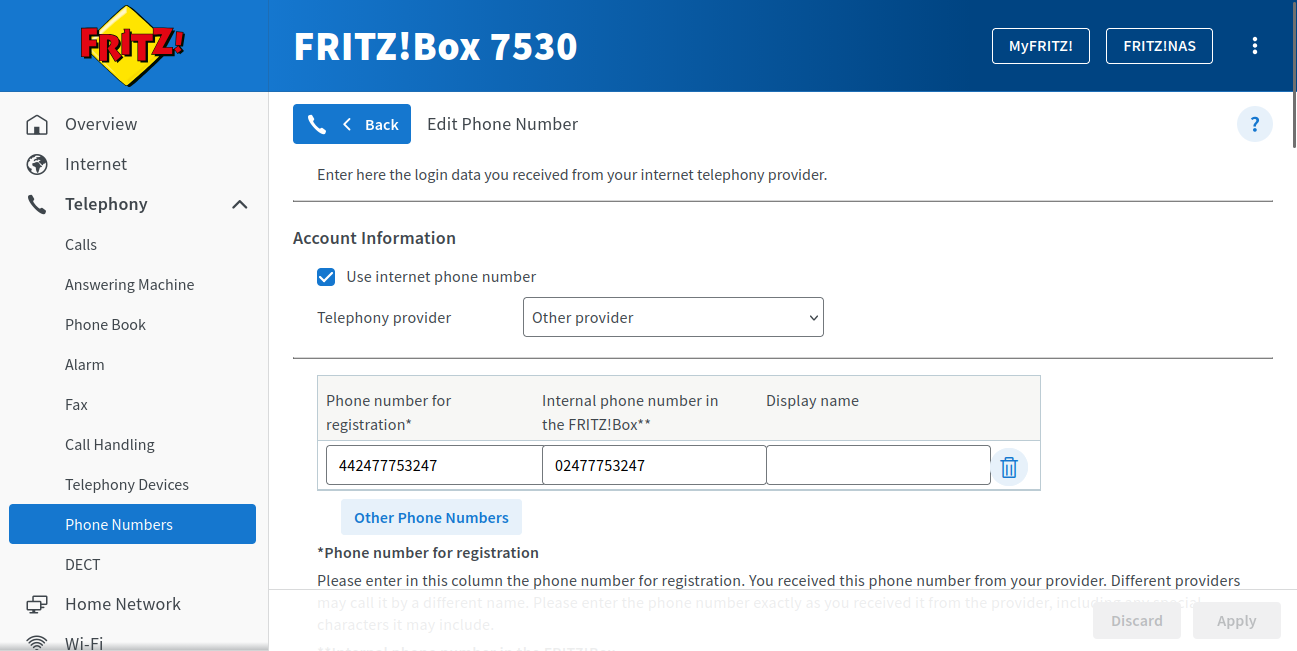
Select Other provider. Keep Use internet phone number ticked if it is shown.
Use your own assigned number. The screenshots use 02477753247 as an example. The two number boxes need different formats:
| FRITZ!Box field | What to enter |
|---|---|
| Phone number for registration | 442477753247. Use your full Lodestar number beginning 44, with no +, spaces or first UK 0. |
| Internal phone number in the FRITZ!Box | 77753247. Enter the local part without the area code. Remove 024 from 02477753247. |
| Display name | Optional. You can leave it blank or enter a useful label such as Lodestar Voice. |
For the registration number, 02477753247 becomes 442477753247: remove the first 0 and add 44. The internal number is separate: remove the whole area code, including its first 0.
If you are unsure which digits are your area code, or your number has no geographic area code, ask Lodestar for the internal number to enter.
Step 3
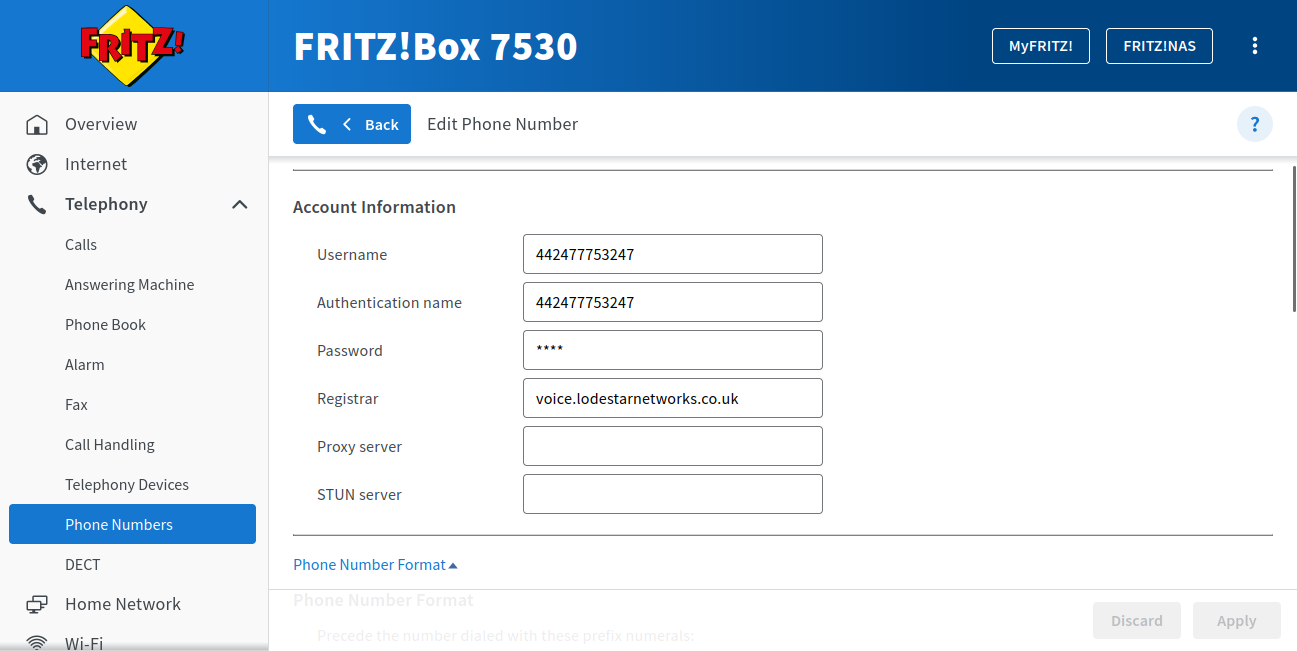
Enter your SIP account details
- Username
- Your full Lodestar SIP username, beginning
44. In this example:442477753247. - Authentication name
- Enter the same full SIP username again.
- Password
- Your private Lodestar SIP password. Copy it exactly. Do not enter your router, Wi-Fi or website password here.
- Registrar
voice.lodestarnetworks.co.uk- Proxy server
- Leave blank.
- STUN server
- Leave blank.
If a separate server-port box is shown, use 5061 with TLS. Do not add a web address prefix such as https:// to the registrar.
Complete the initial wizard if it asks you to do so. Then return to Telephony, Phone Numbers and edit the Lodestar number to reach the remaining settings below.
Step 4
Stop the router adding extra prefixes
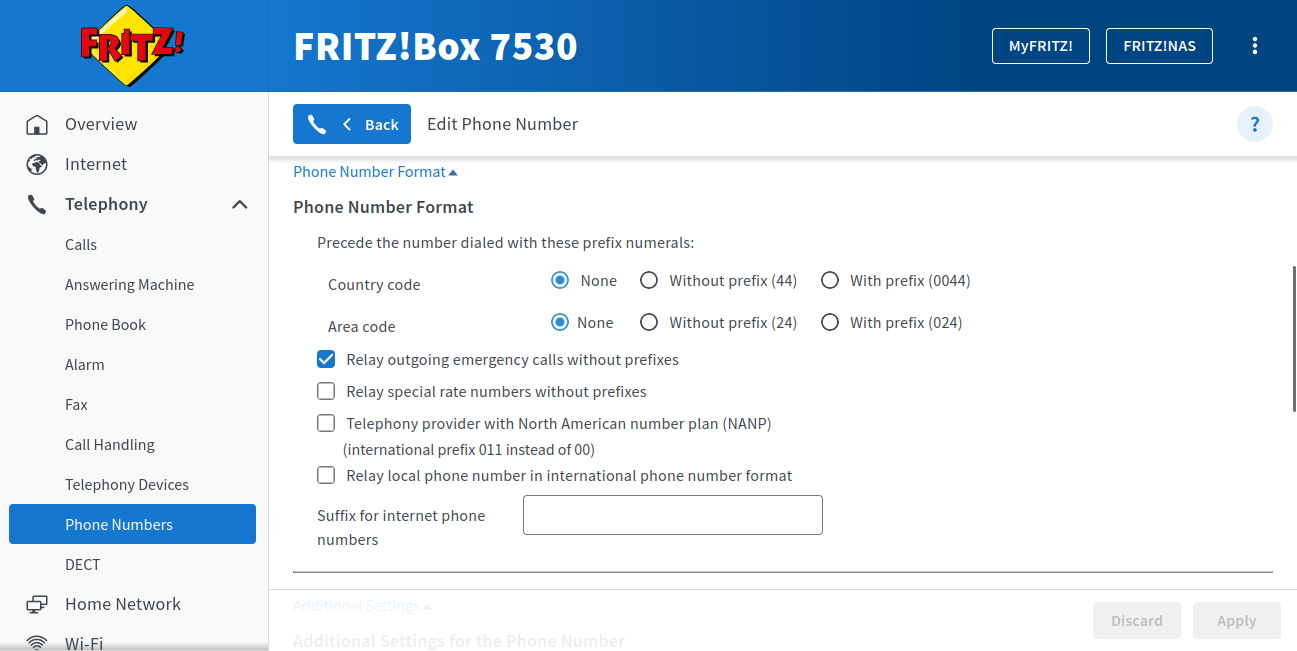
Expand Phone Number Format for this number. Set these exact values:
- Country code
- None
- Area code
- None
- Relay outgoing emergency calls without prefixes
- Ticked.
- Suffix for internet phone numbers
- Leave blank.
Leave the other checkboxes in this section unticked, as shown. These are the formatting controls for this phone number. They are separate from the internal-number box and from the router's general UK location settings.
When making ordinary UK calls, dial the full number including its area code, even for local calls. Dial short service numbers directly, without adding 44 or an area code. Contact support if a service number is unavailable on your account.
Step 5
Check the additional phone settings
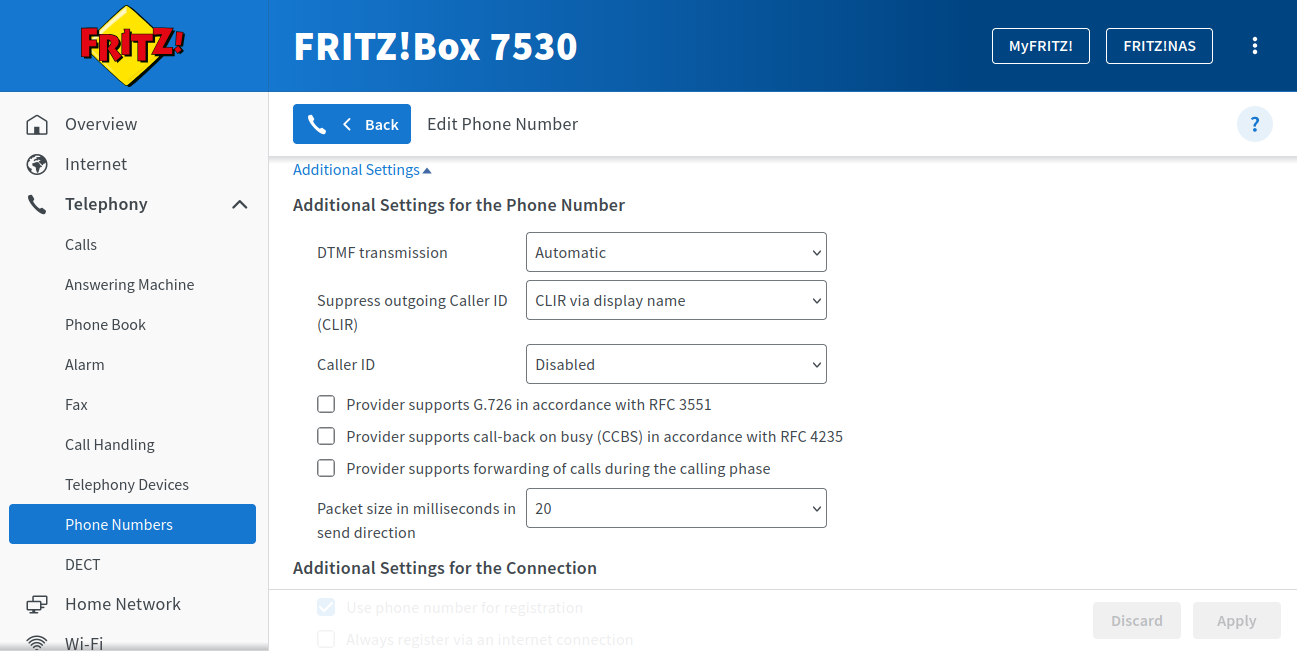
Expand Additional Settings. Set DTMF transmission to Automatic and Packet size in milliseconds in send direction to 20. DTMF is how your phone sends keypad presses to services with a telephone menu.
The extra G.726, call-back on busy and call-forwarding support boxes shown below are unticked in this setup. Leave the remaining caller-ID options at their defaults unless Lodestar has supplied different instructions.
Step 6
Require encryption for signalling and audio
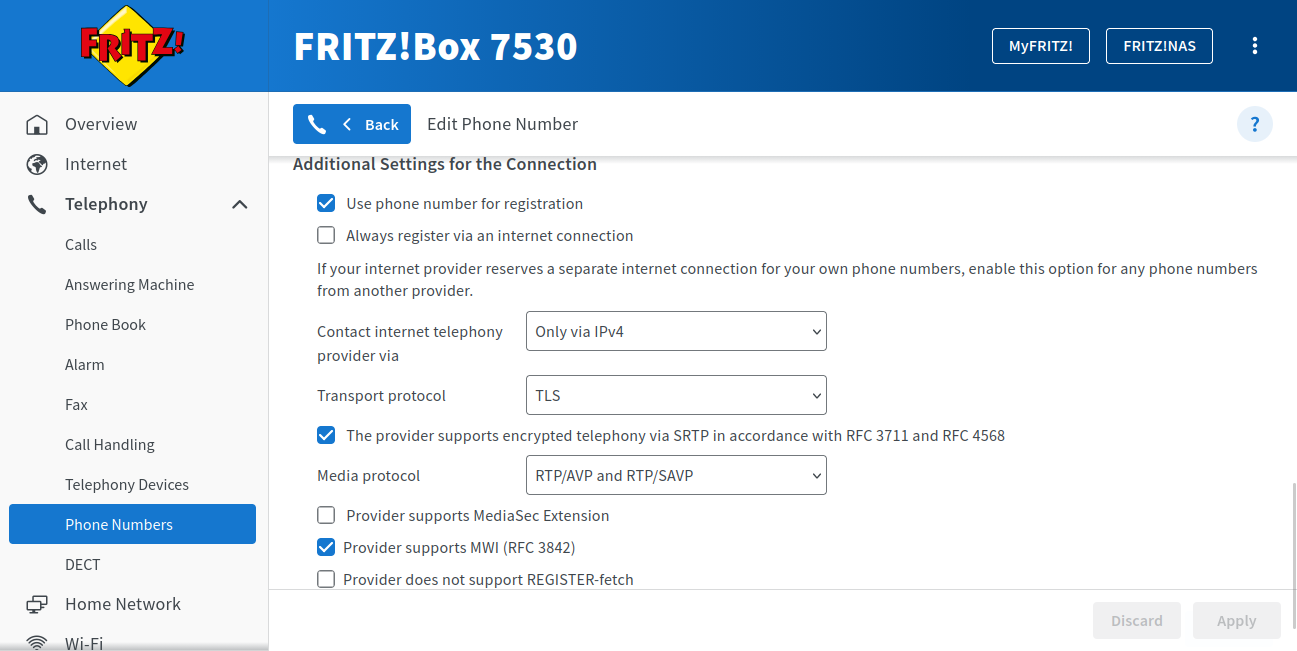
Under Additional Settings for the Connection, use the following settings. Selecting TLS alone does not encrypt the call audio: you need SRTP as well.
- Use phone number for registration
- Ticked.
- Always register via an internet connection
- Leave unticked for an ordinary internet connection. If your broadband provider uses a separate connection for its own telephone numbers, tick this option for Lodestar.
- Contact internet telephony provider via
- Only via IPv4
- Transport protocol
- TLS
- The provider supports encrypted telephony via SRTP
- Ticked
- Media protocol
RTP/SAVP- Provider supports MediaSec Extension
- Unticked
- Provider supports MWI (RFC 3842)
- Leave ticked as shown. This notification setting does not activate a voicemail service.
- Provider does not support REGISTER-fetch
- Leave unticked.
Choose RTP/SAVP on its own. RTP/AVP is unencrypted audio. RTP/AVP and RTP/SAVP allows a mixed or fallback mode. To require encrypted audio, select only RTP/SAVP.
Select Apply and allow the FRITZ!Box to register the number. Follow any confirmation prompt shown by the router.
Step 7
Choose which phone makes and receives calls
Adding a number does not automatically assign every handset to it.
- Open Telephony, then Telephony Devices.
- Select the edit button beside your connected phone or cordless handset. If it is not listed, use Configure New Device first and follow the router's instructions.
- Choose your Lodestar number under Outgoing Calls.
- Under incoming calls, select your Lodestar number so this handset rings when someone calls it. You can also choose to react to all numbers if that is what you want.
- Select Apply. Repeat for any other handset you want to use.
Step 8
Check registration, ringing and sound
- Check the number is registered. Return to Telephony, Phone Numbers. The Lodestar number should show a green or registered status.
- Check an outgoing call. Call an ordinary number you control, such as your mobile. Answer and check that both people can hear each other. Normal plan charges may apply.
- Check an incoming call. Call your Lodestar number from your mobile. Check the intended handset rings, then answer and check the sound in both directions.
- Recheck encryption settings. The saved settings must still show TLS, SRTP enabled and RTP/SAVP. A green registration indicator alone does not prove the call audio is encrypted. If you need confirmation of a particular call, contact Lodestar with the time of that call.
Use ordinary calls for testing. Do not call 999, 112 or 111 to test the setup. Check your registered emergency address with Lodestar and read the power and emergency-calling information.
If something does not work
A few checks before you contact us
The number will not register
Check the registrar spelling, full 44 SIP username and SIP password. Both Username and Authentication name must match the details supplied by Lodestar. Check that the FRITZ!Box has internet access and the correct date and time. Confirm your account is active and enabled for encrypted calling. Look under System, Event Log for the telephone error message.
I cannot find TLS or RTP/SAVP
Finish the initial wizard, then edit the number and expand Additional Settings. Check for a supported FRITZ!OS update under System, Update. If the options are still missing, contact us with your model and FRITZ!OS version before using a different security mode.
It registers, but the phone does not ring
Check Step 7. Select the Lodestar number for incoming calls on the right handset. Confirm that the handset is connected or registered to the router and that do-not-disturb is not enabled.
A call connects but has no sound or only one-way sound
Recheck TLS, SRTP and RTP/SAVP, with MediaSec unticked. Keep proxy and STUN empty. Contact Lodestar with the call time, direction and whether either side could hear audio. Keep the required encryption settings while we investigate.
Full numbers work but short service numbers do not
Check that the Country code and Area code prefix selectors in Step 4 are both None. Dial the service code directly. Availability can depend on the service and your account, so contact Lodestar if it is still unavailable.
Email hello@lodestarnetworks.co.uk with your FRITZ!Box model, FRITZ!OS version, error message and the time of any failed call. Do not send your SIP password.
Manufacturer help
FRITZ!Box 7530 number-field examples explain the distinction between registration and internal numbers. Their other settings are for a different provider; use the Lodestar settings in this guide. See also assigning numbers to handsets and FRITZ!Box call encryption.
Guide updated 1 November 2026. Screenshots supplied from a FRITZ!Box 7530. All phone numbers shown are examples. Use the instructions above with your own Lodestar account details.